Section 4/Amanda
Rock Project
Section 3
|
|
Rocket Fuel
|
|
|
Battery Making
For this experiment we had to make batteries out of pennies and cardboard that has been cut and dipped in vinger and how we made our batteries were by getting the copper off of the pennies in one side and trying to get the zinc so then when we put all of the things in order it would be copper,zinc,Cardboard and repeat. On the bottom were we laid the pennies out was on aluminum foil to see if our battery had power.I will now tell you the materials we need for this experiment below Materials:
|
Instructions:
Making the batteries were really fun to make because me and my partners were having a Struggle because when we were stretching the copper off it was so hard to just get the copper off so we only made 8 pennies and we thought that that it would be enough for our battery but it wasn't we needed up to 10 pennies. So less to say that we had a real struggle to make more zinced up pennies but at the end the battery worked and it was pretty cute because it lighten up in a little bit but it wasn't as strong as the other batteries I don't know why but we tried everything to make it light up brighter but nothing happened to be the same thing.
- Get your pennies that were after 1983, You will be needing around 8-10 pennies
- Once you find your pennies start scratching one side off to get all the copper off that side to get zinc with the sand paper or concrete by scratching it on the floor(dont use your hand if you scratch the penny on the concrete it will burn once you start scratching it hard)
- Once you scratched all of the copper off of one side make sure that the sides are scratched as well so it can worked better
- When all 8-10 pennies are one side copper and the other side zinc get your other material ready to put your battery together.
- Get your cardboard and start cutting it into small squares or circles to put of top of the pennies(I suggest using the circle cut out)
- Get your beaker and fill it up with vinger, Once you got the vinger get your cut outs of cardboard and put them all inside the vinger to get soaked
- Place a piece of aluminum foil on the table and put the copper side of the pennie first on the aluminum foil,let the zinc side facing up then take a piece of cardboard with vinger soaked and don't let it drip vinger so dry it a little but let it still be wet
- Place the still semi wet cardboard vinger on the zinc side of the penny and repeat the pattern until you run out of pennies and cardboards so It with look like this:
- Aluminum foil,copper,zinc,cardboard,copper,zinc,cardboard repeat
- Get your LED Light and place one side to the copper and the other to the aluminum foil to the other if the LED Light lights up you have successfully made your light to keep it all together
- Vinger is very strong so dont smell it close
- while scratching finger nails can get ruined
- don't get vinger anywhere near eyes
Making the batteries were really fun to make because me and my partners were having a Struggle because when we were stretching the copper off it was so hard to just get the copper off so we only made 8 pennies and we thought that that it would be enough for our battery but it wasn't we needed up to 10 pennies. So less to say that we had a real struggle to make more zinced up pennies but at the end the battery worked and it was pretty cute because it lighten up in a little bit but it wasn't as strong as the other batteries I don't know why but we tried everything to make it light up brighter but nothing happened to be the same thing.
|
|
SOAP Making
This experiment we made soap but it wasn't as smelly as we thought it would be so it was not so smelly soap and this is a blog that was much later then we actually made the soap. because I wanted to tell you guys about how it turned out to look and smell and feel like and if it actually worked Know let me tell you that We had spring break and let it dry for 2 whole weeks and like a day so we had it sitting and drying for a while. But let me tell you the things we found out to make the soap.Note to anyone Soap actually does work and leaves hands very soft because of the olive oil. Our Sources: http://www.diynatural.com/how-to-make-soap-2/ http://www.soapqueen.com/bath-and-body-tutorials/cold-process-soap/free-beginners-guide-to-soapmaking-cold-process/ http://smallnotebook.org/tutorials/beginner-soapmaking/ |
Materials:
Reflection:Making the soap was pretty cool but I honestly wish that I put more scent in the soap because since it dried and its hard all it smells like is olive oil and that's not really a good smell for hand soap luckily the soap didn't burn us because some of the hand soap can use lye and I heard lye can burn your skin.I wish the soap didn't look like it was messed up oatmeal and if it was smoother it would've been better.BUT there was some good in making the soap because in the end it made your hands really soft when you washed your hand with it and the reason why your hands got really soft were because of the olive oil inside the soap.
- mixing bowls(Stainless steel, tempered glass or enamel). Don’t use copper or aluminum, they will react with the lye. Some plastics may melt, so don’t use plastic bowls.
- soap mold or silicone baking pan
- pint and a quart canning jar
- newspaper(to cover work area)
- stainless steel thermometer that reads between 90° and 200°(candy or cooking thermometer)
- an old towel(to cover soap when drying)
- Metal spoons for mixing
- immersion blender (optional because it can be stirred with spoon)
- plastic wrap(to cover soap when drying)
- parchment paper or baking rack(to dry soap)
- soap cutter or knife
- wax paper or airtight container(to store soap)
- ⅔ cup coconut oil – to produce good lather (melt first before measuring)
- ⅔ cup olive oil – which makes a hard and mild bar
- ⅔ cup other liquid oil – like almond oil, grapeseed, sunflower of safflower oil
- ¼ cup lye – also called 100% sodium hydroxide
- ¾ cup cool water – use distilled or purified
- 15-20 drops essential oils or around a teaspoon per batch
- Cover your work area with newspaper. Put your gloves and other protective wear on. Measure your water into the quart canning jar. Have a spoon ready. Measure your lye, making sure you have exactly ¼ cup. Slowly pour the lye into the water, stirring as you go. Stand back while you stir to avoid the fumes. When the water starts to clear, you can allow it to sit while you move to the next step.
- In the pint jar, add your three oils together. They should just make a pint. Heat in a microwave for about a minute, or place the jar of oils in a pan of water to heat. Check the temperature of your oils – it should be about 120° or so. Your lye should have come down by then to about 120°. Wait for both to cool somewhere between 95° and 105°. This is critical for soap making. Too low and it’ll come together quickly, but be coarse and crumbly.
- When both the lye and oils are at the right temperature, pour the oils into a mixing bowl. Slowly add the lye, stirring until it’s all mixed. Stir by hand for a full 5 minutes. It’s very important to get as much of the lye in contact with as much of the soap as possible. After about 5 minutes, you can keep stirring or you can use an immersion blender . The soap mixture will lighten in color and become thick. When it looks like vanilla pudding it’s at “trace” and you’re good to go.
- Add your herbs, essential oils or other additions at this point. Stir thoroughly to combine. Pour the mixture into mold(s) and cover with plastic wrap. Set in an old towel and wrap it up. This will keep the residual heat in and start the saponification process. Saponification is the process of the base ingredients becoming soap.
- After 24 hours, check your soap. If it’s still warm or soft, allow it to sit another 12-24 hours. When it’s cold and firm, turn it out onto a piece of parchment paper or baking rack. If using a loaf pan as your mold, cut into bars at this point. Allow soap to cure for 4 weeks or so. Be sure to turn it over once a week to expose all the sides to air (which is not necessary if using a baking rack).
- When your soap is fully cured, wrap it in wax paper or keep it in an airtight container. Handmade soap creates its own glycerin, which is a humectant, pulling moisture from the air. It should be wrapped to keep it from attracting dust and debris with the moisture
- Gloves and goggles
- Lye can eat holes in fabric and cause burns on your skin. Be extra careful when using lye.
- When you mix the lye with water, it will heat up and fume for about 30 seconds to a minute. It may cause a choking sensation in your throat(it’s not permanent and will go away after a few minutes)
- Always add lye to water (not water to lye), and start stirring right away. If allowed to clump on the bottom, it could heat up all at once and cause an explosion.
- Even though lye is caustic and dangerous to work with, after it reacts with the oils in your soap (through a process called saponification), no lye will remain in your finished soap
Reflection:Making the soap was pretty cool but I honestly wish that I put more scent in the soap because since it dried and its hard all it smells like is olive oil and that's not really a good smell for hand soap luckily the soap didn't burn us because some of the hand soap can use lye and I heard lye can burn your skin.I wish the soap didn't look like it was messed up oatmeal and if it was smoother it would've been better.BUT there was some good in making the soap because in the end it made your hands really soft when you washed your hand with it and the reason why your hands got really soft were because of the olive oil inside the soap.
|
|
Extra Alum Crystals UPDATE
This blog is an update of my section 2 blog of alum crystals And showing how I have Kept growing my crystal It grew pretty big from a small little alum crystal to a big clear looking alum greenish crystal. Some of the safety hazards for using alum crystals are
And we had to use not a lot but not a little bit of materials for making the alum crystals |
Materials:
1.Get a beaker and fill it around half way the bigger the beaker the better
2.Get a hot plate and put it around the heat of 8 or 7
3. Get all your materials ready and put the beaker with the water on the hot plate.
4.let the water heat up to 80 check every 2 mins or so.
5.Once its heated up to 80 take it off of the hot plate
6.Pour little by little some of the alum salt powder
7.Stir the Alum salt powder till it doesn't dissolve
8.Check on the bottom to see if there is some alum salt on the bottom of the beaker that isn't dissolving
9. Once it isn't dissolving and there is still a little on the bottom let it sit for a day to form crystals
Reflection:
Since I did this a while ago but I kept repeating on heating and reforming But I was so amazed on how my crystal was growing bigger and bigger and how it stay the color that I wanted it was green but a very light green I thought it would be more green then a very light green but it was still very pretty to me and I thought I did pretty well because it kept growing and I thought that it wouldn't. From the out come I'm glad it got bigger and I Realized that not only was the crystal getting bigger but every time I put it in the hot water with alum in it it also kind of melted so it was weird to see it grow and shrink as well. Im glad that I made the crystals because Andrew said that it was the biggest alum crystal he had seen and it made me proud to make a beauty that big, It was also very pretty to me so I kept it but then it started cracking and broke, Which made me upset because i thought it would stay a pretty crystal.
- Alum powder
- Hot water
- Thermometer
- spoon
- fishing line
- popsicle stick/pencil
- gloves
1.Get a beaker and fill it around half way the bigger the beaker the better
2.Get a hot plate and put it around the heat of 8 or 7
3. Get all your materials ready and put the beaker with the water on the hot plate.
4.let the water heat up to 80 check every 2 mins or so.
5.Once its heated up to 80 take it off of the hot plate
6.Pour little by little some of the alum salt powder
7.Stir the Alum salt powder till it doesn't dissolve
8.Check on the bottom to see if there is some alum salt on the bottom of the beaker that isn't dissolving
9. Once it isn't dissolving and there is still a little on the bottom let it sit for a day to form crystals
Reflection:
Since I did this a while ago but I kept repeating on heating and reforming But I was so amazed on how my crystal was growing bigger and bigger and how it stay the color that I wanted it was green but a very light green I thought it would be more green then a very light green but it was still very pretty to me and I thought I did pretty well because it kept growing and I thought that it wouldn't. From the out come I'm glad it got bigger and I Realized that not only was the crystal getting bigger but every time I put it in the hot water with alum in it it also kind of melted so it was weird to see it grow and shrink as well. Im glad that I made the crystals because Andrew said that it was the biggest alum crystal he had seen and it made me proud to make a beauty that big, It was also very pretty to me so I kept it but then it started cracking and broke, Which made me upset because i thought it would stay a pretty crystal.
ELEPHANT Toothpaste
Friday Last week we made our elephant toothpaste and We did many things to make the elephant toothpaste but first things first, which was trying to make the hydrogen peroxide 30% which took like a day or two to concentrate but first we had to research how to make concentrated 30% hydrogen peroxide so we found out the many things we need for concentrating Hydrogen Peroxide
OUR SOURCES!
Websites:
http://www.sciencebob.com/experiments/toothpaste.php
http://www.stevespanglerscience.com/lab/experiments/elephants-toothpaste#sthash.xhqEDhYd.dpuf
http://www.funathomewithkids.com/2013/08/fun-science-experiment-for-kids.html\
http://chemistry.about.com/od/chemistrydemonstrations/a/elephanttooth.htm
https://www.youtube.com/watch?v=XKli-QGHb40
Our materials for the whole experiment was way different
And the many safety hazards we had to follow in order to make the elephant toothpaste
Normal safety hazards:
Safety hazards:
And Safety hazards for the concentrating Hydrogen peroxide and Potassium iodide
First aid procedures for hydrogen peroxide:
This experiment shows the catalyzed decomposition of hydrogen peroxide. Hydrogen peroxide (H2O2) decomposes into water and oxygen gas, but normally the reaction is too slow to be easily perceived or measured:[1]
2H2O2 → 2H2O(l) + O2(g)The iodide ion from potassium iodide acts as a catalyst—it speeds up the reaction without being consumed in the reaction process.[1][2][3] The iodide ion changes the mechanism by which the reaction occurs:
H2O2+I−→H2O+IO−H2O2+IO−→H2O+O2+I−2H2O2→2H2O(l)+O2(g)ΔrH° = −196 kJ/molThe reaction is exothermic; the foam produced is hot.[1][2]
Reflection:Making the elephant toothpaste was pretty fun but it took quit a long time because we had to concrete the hydrogen peroxide for like two days because we wanted the hydrogen peroxide to be 30% and to do that we had to heat up the hydrogen peroxide and wait until it evaporated up to 30%. But after it went to 30% all we had to do was put everything together and let it do its thing. But it was cool to feel the foam and when I touched it it was hot because of the potassium iodide and what potassium iodide did to the elephant toothpaste was make the reaction turn into foam and it was cool just to feel it but it sucked that I got burned and had some on my skin I didnt feel it but I saw it and it turned white and then magically disappear.
Friday Last week we made our elephant toothpaste and We did many things to make the elephant toothpaste but first things first, which was trying to make the hydrogen peroxide 30% which took like a day or two to concentrate but first we had to research how to make concentrated 30% hydrogen peroxide so we found out the many things we need for concentrating Hydrogen Peroxide
OUR SOURCES!
Websites:
http://www.sciencebob.com/experiments/toothpaste.php
http://www.stevespanglerscience.com/lab/experiments/elephants-toothpaste#sthash.xhqEDhYd.dpuf
http://www.funathomewithkids.com/2013/08/fun-science-experiment-for-kids.html\
http://chemistry.about.com/od/chemistrydemonstrations/a/elephanttooth.htm
https://www.youtube.com/watch?v=XKli-QGHb40
Our materials for the whole experiment was way different
- 50-100 ml of 30% hydrogen peroxide (H2O2) solution
- saturated potassium iodide (KI) solution
- liquid dish washing detergent
- food coloring
- 500 mL graduated cylinder
- Put on gloves and safety glasses. The iodine from the reaction may stain surfaces so you might want to cover your work space with an open garbage bag or a layer of paper towels
- Pour ~50 mL of 30% hydrogen peroxide solution into the graduated cylinder.
- Squirt in a little dish washing detergent and swirl it around.
- You can place 5-10 drops of food coloring along the wall of the cylinder to make the foam resemble striped toothpaste.
- Add ~10 mL of potassium iodide solution. Do not lean over the cylinder when you do this, as the reaction is very vigorous and you may get splashed or possibly burned by steam.
- You may touch a glowing splint to the foam to to relight it, indicating the presence of oxygen
And the many safety hazards we had to follow in order to make the elephant toothpaste
Normal safety hazards:
Safety hazards:
- Must wear gloves and eye protection and have their hair up
- Don’t touch toothpaste without gloves
- Hydrogen peroxide can cause irritation eyes, nose, throat; corneal ulcer; erythema (skin redness), vesiculation skin; bleaching hair
- bubbles contain both peroxide and potassium iodine which will stain clothes, hands, etc.
- if someone gets hydrogen peroxide on them, have them go to the restroom and rinse it off
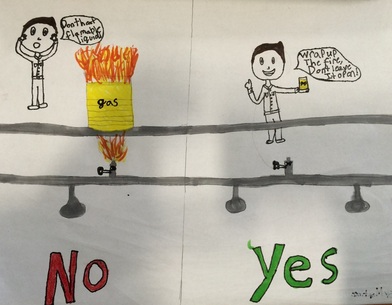
- the reaction is exothermic (releases heat), so no one should touch glassware or bubbles after performing reaction
- Oxygen is evolved in this reaction, so do not perform this demonstration near an open flame.
And Safety hazards for the concentrating Hydrogen peroxide and Potassium iodide
First aid procedures for hydrogen peroxide:
- Eye: Irrigate immediately
- Skin: Water flush immediately
- Breathing: Respiratory support
- Swallow: Medical attention immediately
- Eyes: Immediately flush eyes with copious quantities of water for at least 15 minutes holding lids apart ensure flushing of the entire surface. Call a physician.
- Skin: Immediately flush skin with plenty of water for at least 15 minutes while removing contaminated clothing and shoes. Call a physician. Wash contaminated clothing before reusing.
- Inhalation: Remove patient to fresh air. Administer approved oxygen supply if breathing is difficult. Administer artificial respiration or CPR if breathing has ceased. Call a physician.
- Ingestion: If conscious, wash out mouth with water. Have conscious person drink 2-3 glasses of milk or water (less effective). DO NOT induce vomiting. DO NOT give acidic agents; this may cause an exothermic reaction and burn the esophagus. Never give anything by mouth to an unconscious or convulsing person. Call a physician.
This experiment shows the catalyzed decomposition of hydrogen peroxide. Hydrogen peroxide (H2O2) decomposes into water and oxygen gas, but normally the reaction is too slow to be easily perceived or measured:[1]
2H2O2 → 2H2O(l) + O2(g)The iodide ion from potassium iodide acts as a catalyst—it speeds up the reaction without being consumed in the reaction process.[1][2][3] The iodide ion changes the mechanism by which the reaction occurs:
H2O2+I−→H2O+IO−H2O2+IO−→H2O+O2+I−2H2O2→2H2O(l)+O2(g)ΔrH° = −196 kJ/molThe reaction is exothermic; the foam produced is hot.[1][2]
Reflection:Making the elephant toothpaste was pretty fun but it took quit a long time because we had to concrete the hydrogen peroxide for like two days because we wanted the hydrogen peroxide to be 30% and to do that we had to heat up the hydrogen peroxide and wait until it evaporated up to 30%. But after it went to 30% all we had to do was put everything together and let it do its thing. But it was cool to feel the foam and when I touched it it was hot because of the potassium iodide and what potassium iodide did to the elephant toothpaste was make the reaction turn into foam and it was cool just to feel it but it sucked that I got burned and had some on my skin I didnt feel it but I saw it and it turned white and then magically disappear.
|
|
FAILED BOUNCY BALL EXPERIMENT
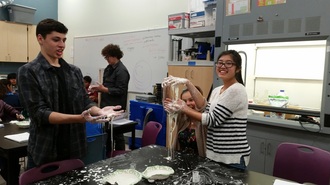
So on Friday We did a test run on our bouncy balls on two different kinds of ways to make the Bouncy balls and one of my partners tried the first solution and i tried the other she chose the solution I did was 3T of cornstarch and 4T warm water and that solution didn't go to well as planned because it turned really stiff and it didn't really want to stick together.So the right materials we chose and found to get stuck together is Materials:
|
The Instructions to making the bouncy balls
http://chemistry.about.com/od/demonstrationsexperiments/ss/bounceball.htm
http://www.hometrainingtools.com/a/make-a-colorful-bouncy-ball
http://www.pbs.org/parents/crafts-for-kids/super-bouncy-balls/
And our
Essential Question: What makes bouncy balls bouncy?
because me and my partners were interested in finding how to make the bouncy balls.
Safety Hazards:
-Science behind the bouncy balls
The reaction between the borax and the glue makes it get stuck together and make it be formed. According to my partners research the borax acts as a "cross-linker" to the glue that has polymer molecules. From those two getting mixed together it starts to create a chain of molecules that makes the glue and the borax get together when picked up and the cornstarch helps the things stay together when you pick it up and mold it.
Reflection:
This project was fun to make but I was sad that my ball didn't turn out to be the way I wanted it to be so it kind of look like a big blob of dried glue with a little bit of food coloring in random parts of the ball. But finding out why the things were getting stuck together was pretty cool to find out because when the glue hit the wet solution it instantly got hard and moldy, I think I did something wrong because I had the wrong solution but then I tried the right solution and my bouncy ball didn't turn out to be together either so I didn't know what I was doing wrong but sometimes the solution doesn't mix well together because it gets hard so fast that its hard to mold it into a ball form.
- In one cup, combine the warm water, cornstarch and borax. In another cup or bowl, put the glue.
- Next, add several drops of food coloring to the white glue and stir well.
- Give your water/borax/cornstarch mixture a good stir to combine all the ingredients (the cornstarch has a tendency to settle on the bottom). Then pour the water mixture into the colored glue.
- Stir and you'll see it immediately start to clump together. Stir a bit more until you have one big, slimy glob.
- Take the glob out of the liquid and begin rolling it between the palms of your hands to form a ball. It'll be sticky at first, so keep a paper towel handy to wipe off your hands occasionally. Soon a rubbery ball will form. (We found that just using our palms seemed to work better than using our whole hands and fingers.)
- Once the stickiness is gone and you have a nice smooth ball, that's it! You can bounce away!
http://chemistry.about.com/od/demonstrationsexperiments/ss/bounceball.htm
http://www.hometrainingtools.com/a/make-a-colorful-bouncy-ball
http://www.pbs.org/parents/crafts-for-kids/super-bouncy-balls/
And our
Essential Question: What makes bouncy balls bouncy?
because me and my partners were interested in finding how to make the bouncy balls.
Safety Hazards:
- Borax and glue are a potential health hazard and should not be ingested or sniffed
-Science behind the bouncy balls
The reaction between the borax and the glue makes it get stuck together and make it be formed. According to my partners research the borax acts as a "cross-linker" to the glue that has polymer molecules. From those two getting mixed together it starts to create a chain of molecules that makes the glue and the borax get together when picked up and the cornstarch helps the things stay together when you pick it up and mold it.
Reflection:
This project was fun to make but I was sad that my ball didn't turn out to be the way I wanted it to be so it kind of look like a big blob of dried glue with a little bit of food coloring in random parts of the ball. But finding out why the things were getting stuck together was pretty cool to find out because when the glue hit the wet solution it instantly got hard and moldy, I think I did something wrong because I had the wrong solution but then I tried the right solution and my bouncy ball didn't turn out to be together either so I didn't know what I was doing wrong but sometimes the solution doesn't mix well together because it gets hard so fast that its hard to mold it into a ball form.
Section 2
ALUM Crystals Day 3
Today as I checked my crystals there was a very big change in the crystals the crystals went from really small to decent pretty big size. I'm very glad to see that my crystals worked and Hopefully It Grows more today. Today I reheated the solution and hopefully my crystals turn to get bigger if it doesn't work I will cry to put more alum salt inside the water.I also forgot to say that I tried to make two different alum crystals I have tried to make my alum crystals more into colorful alum crystals so I added some green food coloring to the alum water and mixed it.I mixed it all together like with alum salt inside the water already and I thought it would work more then I thought it would work more but It only turned into a very light green color but it still had some green in the crystal and when I reheated the alum water and and put it back in and waited a day my small baby crystal turned bigger and more green in the inside which was cool because when I touched the crystal it felt like It was wet but it wasn't at all it was dry and I thought that the green would just fall of but the crystal stayed a light green color.SO like I said I reheated the alum salt and IM waiting to see on monday to see if my crystal have gotten any bigger, But I also have a theory that my crystal with start to get smaller because of the weekend hopefully it doesn't melt because of the water being at room temperature, If so I will keep an update on the crystals to see if it shrunk or if the crystals stayed the same because I didn't add anymore alum salt.
Today as I checked my crystals there was a very big change in the crystals the crystals went from really small to decent pretty big size. I'm very glad to see that my crystals worked and Hopefully It Grows more today. Today I reheated the solution and hopefully my crystals turn to get bigger if it doesn't work I will cry to put more alum salt inside the water.I also forgot to say that I tried to make two different alum crystals I have tried to make my alum crystals more into colorful alum crystals so I added some green food coloring to the alum water and mixed it.I mixed it all together like with alum salt inside the water already and I thought it would work more then I thought it would work more but It only turned into a very light green color but it still had some green in the crystal and when I reheated the alum water and and put it back in and waited a day my small baby crystal turned bigger and more green in the inside which was cool because when I touched the crystal it felt like It was wet but it wasn't at all it was dry and I thought that the green would just fall of but the crystal stayed a light green color.SO like I said I reheated the alum salt and IM waiting to see on monday to see if my crystal have gotten any bigger, But I also have a theory that my crystal with start to get smaller because of the weekend hopefully it doesn't melt because of the water being at room temperature, If so I will keep an update on the crystals to see if it shrunk or if the crystals stayed the same because I didn't add anymore alum salt.
ALUM Crystals Day 2
Today is day 2 of the alum crystals and pretty much an update of the crystals and how it has grown.I checked the crystals and they turned out to be really small and stuck on the bottom of the beaker but its supposed to be because in order for me to form my crystals bigger I have to tie fishing line onto a small crystal that's formed on the bottom of my beaker and once I have tied the little crystal I have to reheat the alum water all the way to 80 and once its to 80 let it cool done just a bit and tie the fishing line to a pencil or something so it can be held in the middle of the beaker but once it is done cool off a bit let the alum crystal bit very still in the middle of the beaker still touching the alum water and let it sit there again for a day to let some crystals form on the small crystal.One thing I realized when the water was reheating I left the crystals I didn't use in the beaker and then when it was heating up I can hear the little crystals popping and cracking because of the heat of the alum water since I was reheating the alum water the crystals are melting. Before I reheated the alum water I saw that all of the alum was at the bottom of the beaker with the crystals, like the water was more clear then before I took the crystals out and put them back in since the crystals are the alum salt the alum salt is with the crystals on the bottom of the beaker.Today there wasn't a big change with the crystals besides me trying to get them bigger so hopefully tomorrow the crystals form more bigger then they are right now.
Today is day 2 of the alum crystals and pretty much an update of the crystals and how it has grown.I checked the crystals and they turned out to be really small and stuck on the bottom of the beaker but its supposed to be because in order for me to form my crystals bigger I have to tie fishing line onto a small crystal that's formed on the bottom of my beaker and once I have tied the little crystal I have to reheat the alum water all the way to 80 and once its to 80 let it cool done just a bit and tie the fishing line to a pencil or something so it can be held in the middle of the beaker but once it is done cool off a bit let the alum crystal bit very still in the middle of the beaker still touching the alum water and let it sit there again for a day to let some crystals form on the small crystal.One thing I realized when the water was reheating I left the crystals I didn't use in the beaker and then when it was heating up I can hear the little crystals popping and cracking because of the heat of the alum water since I was reheating the alum water the crystals are melting. Before I reheated the alum water I saw that all of the alum was at the bottom of the beaker with the crystals, like the water was more clear then before I took the crystals out and put them back in since the crystals are the alum salt the alum salt is with the crystals on the bottom of the beaker.Today there wasn't a big change with the crystals besides me trying to get them bigger so hopefully tomorrow the crystals form more bigger then they are right now.
ALUM Crystals Day 1
Today I started to look at my friend ivy make some alum crystals and i got really interested in it because when the crystals form it looks pretty clear rocks and I got interested because i thought if they can turn clear can I make some alum crystals that are colorful.What I found out was that alum is a type of salt that can make crystals.What I'm wondering is if we put the alum crystals in regular water would the crystals dissolve in the water and make alum water.So There is something I will be try next once my crystals form again. I got a breaker that was a decent size to put water to the middle. Once I got the breaker with water, I got a hot plate put it all the way to 7 or 6 to let the water inside the beaker heat up to 80, to know when the water is up to 80 get a thermometer and every once in a while check to see how hot the water has gotten. Once it has gotten to 80 get your alum salt and start pouring little by little the alum salt and mix it around with a stirrer,You'll know when your good to let the alum crystals form when you see the alum not dissolving. Once in a while you should also check the bottom to see if a little bit of alum salt is on the bottom and if theres a little bit of alum at the bottom let it sit and let it form. So Far all you have to do is water till the crystals form and they start forming in one day so it doesn't take too long to form.Check the next day to see how your crystals turn out just like me. Im pretty excited to see how my crystals form because I want to see how big the crystals can get with in the days of forming. When I was mixing the alum salt inside the water It turned like a dirty clear color it wasn't so clear but it was like you can see in the water, but everytime I kept adding more alum salt it just stayed the same way. It was cool how everytime I put alum inside the water it stayed the same and it slowly stopped dissolving. I would want to make a pretty necklace with the alum crystals if i ever try to make them in a different time.
Today I started to look at my friend ivy make some alum crystals and i got really interested in it because when the crystals form it looks pretty clear rocks and I got interested because i thought if they can turn clear can I make some alum crystals that are colorful.What I found out was that alum is a type of salt that can make crystals.What I'm wondering is if we put the alum crystals in regular water would the crystals dissolve in the water and make alum water.So There is something I will be try next once my crystals form again. I got a breaker that was a decent size to put water to the middle. Once I got the breaker with water, I got a hot plate put it all the way to 7 or 6 to let the water inside the beaker heat up to 80, to know when the water is up to 80 get a thermometer and every once in a while check to see how hot the water has gotten. Once it has gotten to 80 get your alum salt and start pouring little by little the alum salt and mix it around with a stirrer,You'll know when your good to let the alum crystals form when you see the alum not dissolving. Once in a while you should also check the bottom to see if a little bit of alum salt is on the bottom and if theres a little bit of alum at the bottom let it sit and let it form. So Far all you have to do is water till the crystals form and they start forming in one day so it doesn't take too long to form.Check the next day to see how your crystals turn out just like me. Im pretty excited to see how my crystals form because I want to see how big the crystals can get with in the days of forming. When I was mixing the alum salt inside the water It turned like a dirty clear color it wasn't so clear but it was like you can see in the water, but everytime I kept adding more alum salt it just stayed the same way. It was cool how everytime I put alum inside the water it stayed the same and it slowly stopped dissolving. I would want to make a pretty necklace with the alum crystals if i ever try to make them in a different time.
LIP BALM
Today I saw three of my good friends, Ivy,Erika,Carmina make some lip balm and it was very fun to watch, They had a lot of interesting things to make the lip balm. I started to help them out on making lip balm because I had nothing else to do that day, I decided to help them measure and make some lip balm as well.They would have asked me to make the lip balm together but I wasnt here one day and I had to make my own lip balm independent sheet so I asked erika and ivy and carmina for help on where they found there information and went on the computer to make my sheet.That same day andrew wasn't here for me to get it checked off but I decided to make the lip balm with them just in case so when andrew did come I could get it checked off and then I would just be able to post it on my blog but apparently then next day andrew didn't come to school either. So here I am with the lip balm all done and ready to get it approved but andrew isnt here.BUT After all I already made the lip balm and hope we made the lip balm was by double boiling the solution. First we got a pot of water and filled it half way then we put the measuring cup in the water while it is getting ready to get boiled, before we did everything else we plugged in our hot plate so it can start heating up for our pot of water, After we put the pot of water on the top of the hot plate that has been heating up we added like 1 or 2 teaspoons of beeswax into the measuring cup to let it melt. Once some of the beeswax was melted we add coconut oil inside the melted wax we added around 2 and a half spoon fulls of coconut oil into the melted beeswax wand mixed it around once all the mixture was melted we added like to squeezes of honey to make the mixture more moist after the honey we added a little bit of peach flavoring to make it have some flavor. Mixed all the mixtures together and once it was semi good on the melted mixed together part we started to add it into the containers that we wanted it to be in, We pour it into the containers and let it sit on the table and dry and it is ready to be used in two hours. It was very fun to watch and make it was pretty simple. I loved how the coconut oil reacted to the heat so quickly like it melted so quickly.
Today I saw three of my good friends, Ivy,Erika,Carmina make some lip balm and it was very fun to watch, They had a lot of interesting things to make the lip balm. I started to help them out on making lip balm because I had nothing else to do that day, I decided to help them measure and make some lip balm as well.They would have asked me to make the lip balm together but I wasnt here one day and I had to make my own lip balm independent sheet so I asked erika and ivy and carmina for help on where they found there information and went on the computer to make my sheet.That same day andrew wasn't here for me to get it checked off but I decided to make the lip balm with them just in case so when andrew did come I could get it checked off and then I would just be able to post it on my blog but apparently then next day andrew didn't come to school either. So here I am with the lip balm all done and ready to get it approved but andrew isnt here.BUT After all I already made the lip balm and hope we made the lip balm was by double boiling the solution. First we got a pot of water and filled it half way then we put the measuring cup in the water while it is getting ready to get boiled, before we did everything else we plugged in our hot plate so it can start heating up for our pot of water, After we put the pot of water on the top of the hot plate that has been heating up we added like 1 or 2 teaspoons of beeswax into the measuring cup to let it melt. Once some of the beeswax was melted we add coconut oil inside the melted wax we added around 2 and a half spoon fulls of coconut oil into the melted beeswax wand mixed it around once all the mixture was melted we added like to squeezes of honey to make the mixture more moist after the honey we added a little bit of peach flavoring to make it have some flavor. Mixed all the mixtures together and once it was semi good on the melted mixed together part we started to add it into the containers that we wanted it to be in, We pour it into the containers and let it sit on the table and dry and it is ready to be used in two hours. It was very fun to watch and make it was pretty simple. I loved how the coconut oil reacted to the heat so quickly like it melted so quickly.
|
|
Helping out Natalie/betty Bath bombs
Today was friday and I helped out Betty and Natalie try to make bath bombs. Its my first time being in the position of a manger and I like helping people out so I was excited. We did all the steps that the instructions said and made everything very well. I did our bath bombs very differently from what they did because they had two bowls one for the dry ingredients and the other was for the wet ones. But when I made my bath bombs we put all ingredients in one blow dry and wet together and it worked perfectly fine. When we made the mixture it was good but then we left it sit for a while and then it became to be dry we added a bit more water and it work but then the mixture soon became very dry so fast so we kept adding water but then we added to much water and it became to wet to make anything we only made about four or three bath bombs because it was to hard to mold because if you get the mixture to wet it doesn't work anymore.What I realized that we used was regular salt instead of epson salt and regular salt is more dry which I think made the mixture to dry to mold. We made a mistake but we have learned from those mistakes to not do it again. For my first try on being a semi manger I did pretty good pretty bad because I feel like I ruined the project. I wish to be a manger again and help out others and not mess up things for there project. |
|
|
Candle Making day 3
So today I finally got to make my own candle and One thing I forgot to write in my blog was that we also had to hot glue our wick in the middle of our jar and at first it was so hard to glue it on for me because what my partner did was glue the wick on for me but then it accidentally fell off and I had to re-glue it back to the bottom of my jar but before I glue the wick I decided that I want to have glitter on the sides of the jar to add a little glow to my candle and so what I did was got corn syrup and water together in a little beaker and mixed it together with a paintbrush and put it on the sides of my jar I also got help from my friend natalie to help me pour the glitter of the sides and she put it all around the sides so she helped me with my jar and when it was time to glue on the wick it was hard because there was corn syrup and water at the bottom of the jar where I was gonna glue the wick and it had glitter on it for i had to somehow clean a bit of the glitter and corn syrup off of the bottom of the jar and once that was done I glued the wick and finally I was done making my jar look nice and then I started to make my wax and everything but there was a lot of problems because the power kept getting off because a lot of people were using the plugs at the same time so it made the power shut off. It happened a couple of times so it made the wax melt even slower but after I got finished with the wax melting I added my color and my scent, waited till it melted, let the wax cool down a bit and poured it into my jar. I set it aside to let it cool down inside the jar and dry and once it was done it looked very pretty. One thing my group forgot to do it put a stick down the middle where the wick is so when the wax dried it didnt make a hole in the middle and thats what happened to my candle because i forgot to put a stick down the middle. But after that we didnt have time on thursday to do anything in chemistry so today on friday we started again and I got my candle and it works out great. To see my candle there is a little slide show of the side of this paragraph. |
|
|
Candle Making day2
Its actually the second week of the section two and its tuesday and today we started making the candles we started of with getting all the materials together and when we got all the materials we heated up the hot plate and got the pot filled with water to somewhat half way to the middle and put the pot of water on top of the hot plate to get the water hot, while the water was warming up we got the measuring cup and started to double boil which is putting the measuring cup inside the hot water. When the measuring cup was in the hot water we put soy wax inside the measuring cup so it can start melting, We filled the measuring cup with soy wax up to the top and once it was melted completely we added more soy wax. Once it all melted down we added scents to the melted wax to have some smell while the scents were also melting we broke small piece of whatever color crayon the person wanted and added it to the melted soy wax we mixed it all together and it made the soy wax change color. It took a while for the scents to melt and for the soy wax to melt as well. We let the the wax cool of just a little to be poured into the jars and some of us added glitter while we poured the hot wax inside the jars to let it have a pretty effect. We only got to make 3 jars of candles (not including mine). I got stuck making my candle the next day because we kind of lost time with melting because it took a while to make. Hopefully I will make my candle tommorow. But for the mean time my partners took photos some photos of there candles that turned out very pretty. |
Candle Making day1
We got the candle making individual project approved and we started to make plans on who brings what to start making the candles the next week that comes. I have bought the mason jars to pour the candle wax inside. My other partners bought the soy wax and wicks and other materials that we need to make the candles. We got this idea from a friend from our class that made candles too so me and Ivy though it would be cool to make candles of our own we got two other peoples to join us on making the candles.BUT instead of making the candles just with smell we wanted the candle to have color too at first we thought that food coloring would be perfect but then we found out the food coloring just gets burns in the wax so then we had to find out how to make our candles have color without having it get burnt wax. We looked up online and found out the crayons are wax that melts just like wax and its also colorful so we decided to get crayons as well. I filled out a document on all the hazards,materials,instructions,etc. and got it approved by Andrew. To see the document of all candles click the button below.
We got the candle making individual project approved and we started to make plans on who brings what to start making the candles the next week that comes. I have bought the mason jars to pour the candle wax inside. My other partners bought the soy wax and wicks and other materials that we need to make the candles. We got this idea from a friend from our class that made candles too so me and Ivy though it would be cool to make candles of our own we got two other peoples to join us on making the candles.BUT instead of making the candles just with smell we wanted the candle to have color too at first we thought that food coloring would be perfect but then we found out the food coloring just gets burns in the wax so then we had to find out how to make our candles have color without having it get burnt wax. We looked up online and found out the crayons are wax that melts just like wax and its also colorful so we decided to get crayons as well. I filled out a document on all the hazards,materials,instructions,etc. and got it approved by Andrew. To see the document of all candles click the button below.
DAY 1 Research
Today I have found my partners for the candle making and we are ready to put everything down on paper and get it approved hopefully we will be able to start making the candles next week to start getting Our points together,I have been trying to post my Daily doings of what i have done in my blog but its a bit hard when you don't have a computer. So far what I have Found out a few details on how candles have something to do with chemistry and The more i have been finding out the more interested i have been getting to make the candles.
Today I have found my partners for the candle making and we are ready to put everything down on paper and get it approved hopefully we will be able to start making the candles next week to start getting Our points together,I have been trying to post my Daily doings of what i have done in my blog but its a bit hard when you don't have a computer. So far what I have Found out a few details on how candles have something to do with chemistry and The more i have been finding out the more interested i have been getting to make the candles.
|
|
2/25/15 Lab Day
Today instead of having free time to get our points We need, we made a lab and what the lab was about how atoms are every where. What is an atom people might say and what I learned an atom is is That an atom is the smallest unit of an element. You cant see atoms but atoms are everywhere you go and how atoms are made is subatomic particles pretty much all together. Atoms are pretty much anything you can think of they are everywhere anywhere.Even if you cant see atoms, atoms are little particles everywhere that are made with other little particles. Unfortunately I wasn't able to do anything in this lab because i didn't have the proper clothing to work on this But Instead I was observing and I made a time lapse of the project and Saw how the magnesium and citric acid reacted together when its in water and what we did is put a balloon of the tip so all of the hydrogen blew up the balloon and let it float. When we first poured the citric acid in the flask, we had to move quickly to put the balloon on top to get the hydrogen inside the balloon but when we pour the citric acid with the magnesium it reacted slowly on making hydrogen but when the citric acid hit the water it made some fuzziness in the flask then it stopped and just made hydrogen. I saw that the citric acid reacted with the magnesium and water quickly so it made hydrogen pretty slowly but it wasn't noticeable until the end where the balloon was pretty blown up and then we tied the balloon to keep the hydrogen inside and when we let go of the balloon it was floating slowly going up,which was really fun to play with and tried so hard not to let it go all up but once everyone had there balloon blown up we lite a candle on fire and turn off the lights and put the balloon near the fire and it exploded. it was very cool to see the hydrogen inside the balloon explode and once it exploded andrew showed up that it had a little bit of water in the balloon from the hydrogen. |
WEEK 1 section 2
This week I haven't been doing a lot lately because I have been trying to find out what candles are related to chemistry and nothing seems to be popping up,But it isn't just any ordinary candle making,It was making crayola candles with some smell. I have been looking at other people make different experiments like Ivys group made pop rocks but then it turned out to be sour taffy and I helped them get the ingredients and helped them put it all together but I wasn't in there group sadly.I also looked at Natalie and Betty who made normal scented candles which made me think of making my own and so today I am Updating my blog for section 2 of chemistry and also researching how to make candles and what we need in order to be able to make the candles.Hopefully I get all The points I need to get this successful and get it approved.
This week I haven't been doing a lot lately because I have been trying to find out what candles are related to chemistry and nothing seems to be popping up,But it isn't just any ordinary candle making,It was making crayola candles with some smell. I have been looking at other people make different experiments like Ivys group made pop rocks but then it turned out to be sour taffy and I helped them get the ingredients and helped them put it all together but I wasn't in there group sadly.I also looked at Natalie and Betty who made normal scented candles which made me think of making my own and so today I am Updating my blog for section 2 of chemistry and also researching how to make candles and what we need in order to be able to make the candles.Hopefully I get all The points I need to get this successful and get it approved.
Section 1DAY3 BATH BOMBS
I have Came back for the sickness of the week that i was gone I had to get my own materials and be Ready to make my own bath bombs but there was one problem.There was not citric acid so I had to wait about two or three days to get the citric acid. Once the citric acid came I got all my materials and got ready to make my bath bombs. I got my two partners that made the bath bombs before and asked for there help to make the bath bombs. First thing we did was get the tools we needed to make the powder for the bath bombs. Then we got four or three pots to make different color bath bomb powder. I used citric acid, baking soda, corn starch mixing them together once it was well mixed we got the pots and split the powder into four pots, We added different food coloring into each pot and made blue, purple,green, and orange even if it was supposed to be pink but someone who wasn't part of my group put green into the pink which made orange, I wasn't happy at all but I let it slide. Once it was all in the pot and with food coloring we added the essential oils to give it some smell and also added water to make it moist.with both of those in the mixture inside the pot we started to mix it with our hand and kept adding water to the mixture until it got to a wet sand feeling.Once you get the wet sand feeling in the mixture you get your tennis balls and (now that we have cut the tennis balls in half) add the powder inside the tennis balls and smoosh the tennis ball together and did the same thing with the other.Once both sides of the tennis balls are filled you smush them together and squeeze the side of the edge lightly until it pops right out do the same with the other side and then smoosh them together until you have made a ball and we made this with about 8 bath bombs and accomplished our project.(photos shown above) Day2 BATH BOMBS
I had got all the materials I needed to make the bath bombs but sadly I was sick and wasn't able to make anything and didn't go to school. I was very upset that i couldn't do anything because I wasn't at school. While my partners were at school and i was at home they were making there own bath bombs.Which brings me to that i didn't go to school for the whole week so i wasn't able to make my own bath bombs. Day 1 BATH BOMBS
Today we started to research on how to make our bath bombs and my group and I saw some youtube videos on how to make it and how to mold it. there was a lot of videos we saw that had different kinds of molds and We saw that someone used tennis balls to shape the bath bombs so we decided to make the bath bombs molding it with tennis balls once we decided to go with how we are going to mold it, we looked for what we should add inside the bath bombs to make it cute once they have been in the water. We mainly decided to add glitter in our bath bombs and little flowers and sprinkles. We researched why citric acid reacts to water and why does it reaction the way it does. We put it all down on paper and got it checked off. I stay on the computer and looked for the steps on how to make the steps and one by one to see what we know on what to do when we start to make the bath bombs. I had to bring some food coloring, some flowers(eatable/fake flowers) and my partners what ever they wanted to bring.We planned everything and on what day to make it and we are ready. 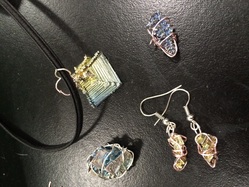
INDIVIDUAL project day 2
Today we had finished the bismuth but still trying to get more pretty crystals and today i think it was very successful because we made a very pretty bismuth piece and it made like little pyramids inside.(if you want to see look at the slide show below). Once all the right piece that we want are complete we started to make it into jewelry i made a necklace and some earrings with a little nice ring.I tried to make the jewelry more popping with some wire wrapped around and it also supported the bismuth inside the wire to make it into anything that i need it to be. The one that looks like a pyramid i had to solder it and make a little hoop for it to be stable but sadly the wire part broke off and so did the little hoop so i bent the wire and made another little hoop and attached the little pyramid and then put a string and made it into a necklace. The jewelry took me about three or two days to make so it would be stable enough to become whatever I made it into. The light blue bismuth I turned it into a necklace and what i did was wrapped it all over to make it look pretty and added a hoop. The earrings took me quit a while to make because it almost broke and the way I wanted didn't look right so i had to take it off and do it all over but in the end i liked how i made it and left it as it was. INDIVIDUAL PROJECTS DAY 1 2/4/15
Today we started to make bismuth on our own and how we started is by melting the bismuth in a little pot on a hot plate and once both pots of bismuth was heated and melted, We took off the extra bismuth that wasn't so good and dumped it in a little pot once it was good we poured one of the pots inside the other and let the other cool down on the hot plate. Once it is semi cooled down we poured out the rest of the hot bismuth and hopefully it formed crystals inside. Once we have enough pretty little crystals we are trying to make jewelry.Today was a successful day because we got really pretty crystals to make our jewelry. We made many batches of bismuth and not a lot of crystals,we melted and remelted and sometimes the crystals did not want to form. Once we got some crystals we let it be for the day but we did nothing but melt and break some bismuth. We also tired getting different colors of bismuth by covering it while it was in the pot once we poured it out of course. we let it sit cooling on the table upside down and it made a very beautiful purple pink blue color it was something really pretty but it hardly made any crystals inside so we were disappointed. |
MATTER LAB 2
This lab we used dry ice to find out how solids can turn into liquid and we got to play around with it and see how everything reacted to the carbon dioxide. We played with it by blowing on it,Putting it in water and what we tried doing is making the most carbon dioxide and why it reacts so well with the water.We used flask with water in it and put the dry ice in there and it started to make carbon dioxide and once it started we got some bubble soap and put it around the flask and started to make bubbles and it made bubbles with carbon dioxide in them.Dry Ice can be hot if you touch it for a long time because it is that cold. Dry Ice turns into Carbon dioxide once it has reacted to water or any liquids.We also put a piece of dry ice in a balloon to see how big it can get without popping,The balloon with carbon dioxide in it was a 20 cm. When we measured it.Once we popped the balloon there was no carbon dioxide inside of it. The carbon dioxide stops once the liquid that has dry ice in it because of how cold the water gets the warmer the liquid you get the more carbon dioxide you get. |
MATTER LAB 1
We made some oobleck and what oobleck is is cornstarch and water together and we had to find out if it was a solid or a liquid. We had to touch it and feel it and experiment with it to see weather if it is a solid of a liquid. My group thought it is a liquid because we dropped a penny in it sunk in but another thing is when we punch it or touch it hard it turned into a solid.
This was our very first experiment that we had made in chemistry, Me and ivy thought that this was a liquid instead of a solid, we played with it for a long time just trying to find out how this oobleck turns into a liquid to a solid. If you added to much water to the cornstarch it would not work and turn just into a water milk looking substance and if you added to much cornstarch it would be just plain hard cornstarch together that doesn't make anything.
My safety poster
Interview quote
"If you stop them for exploring, There not learning"
I choose this quote because I thought it was interesting when he said it because that is actually a good point because in order for us to learn we have to explore new things. I just really liked the quote because it hit me all of a sudden, and what it means to me is to explore more to get more learning.It provokes me to go out and explore more to learn new things.
